Within the restoration of furniture, one of the most sought-after works is how to restore an old trunk. And the old trunks have a special charm. You can decorate any room. It is very practical to store things in it.
In today’s article, we will explain how to restore an old trunk out of this process on a trunk that does not have serious damage to its structure. In case you need or want a more professional service and better results you can always send us a free application, and we will contact you with the best furniture restorers.
How to restore an old trunk?
To carry out this work of restoring an old trunk, we must be very careful to avoid mistreating the piece. It is a relic that we must protect and thus continue to conserve important pieces for history. We will see the steps about how to restore an old trunk.
Step 1: Clean the trunk

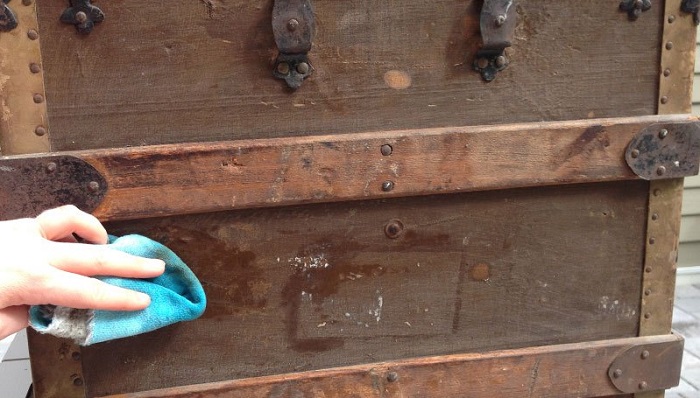
Clean our trunks with love and patience because sometimes the layer of dirt hides problems. You can clean it with just a damp cloth and rub it patiently. We recommend warm water with a little soap (do not use chemicals). The idea is to see the oxidation state of the metal and check that the wood is not rotten or has woodworm.
Step 2: Disassembly of the trunk

Remove the cover and leather accessories (if any). Tacks fasten most of it, screws and nails are firmly fastened in the wood and have their tips bent. This is where a sharp chisel will help us with removing them.
You should be as careful as possible since if you simply pull the nails, you can break the wood leaving holes that will require more work. To remove the screws and nails, the best option is to look for the tips inside the box with the greatest care. Then use the pliers to straighten the tips as best you can. Then you can pull the nails from the outside without the danger of breaking the wood.
If the nails are not in poor condition, they can be reused. Otherwise, they will need to be replaced. The rest of the fittings, such as the metal frame and the hinges, can be removed in the same way, but as you will see later, it may be better to leave them on.
You may like also: how to make wood floors less slippery
Step 3: Remove the metal oxide

To recover the original state of the metal, the best way is to use a wire brush with the drill to polish the oxide layer. Different wire brushes will have greater or lesser sanding force. If you want to make a smoother sanding to give an older look to use less force.
One advantage of the wire brush is the ability to enter all corners and cracks. The trick is not to press too hard since you do not want to polish the metal, you just have to remove the outer layer of rust leaving visible the aged metal is under the rust.
Step 4: Remove the canvas cover

In this part, we will work the wood to leave it without impurities. The first thing will be to remove the canvas lining, which is an easier step, and in most cases, it will only be enough to remove it from the wood. We can find ourselves with paper coating. Sometimes in the original construction, they used a paste of flour and water as water-soluble glue. We can still find some stains to remove them. Use a damp sponge and soft scraping.
To remove the cloth, you can use a knife or scissors. Cut the fabric as close as possible to the seams, cutting around the metal. When you have removed most of the fabric, use the scraper to hide any rest under the seams, and the knife to cut the remains. For the corners better a screwdriver or a chisel that works just as well.
Keep reading: Fridge smells like a dead animal
Step 5: Sanding work

Since we have disassembled and we have eliminated the most superficial work, we go to the most delicate and deep work, and for this, we start sanding the wood.
The best way to start is to use a 60 grit graduated sanding to eliminate some of the most visible damage and then gradually reduce the grain until the piece is smooth and smooth. For the edge of the paper, start with 220 and then with 300 (unless it is badly damaged, then you can use 150).
The paper is layered, so if you obliterate one layer, continue sanding until you reach the next one. Try not to sand the tacks that hold the paper too much.
Step 6: Finished inside the trunk

The interior should be thoroughly washed with bleach and water to remove any mold and then let dry before sanding. It is essential to sand very well since you will not cover it again with paper or cloth (unless you really want to).
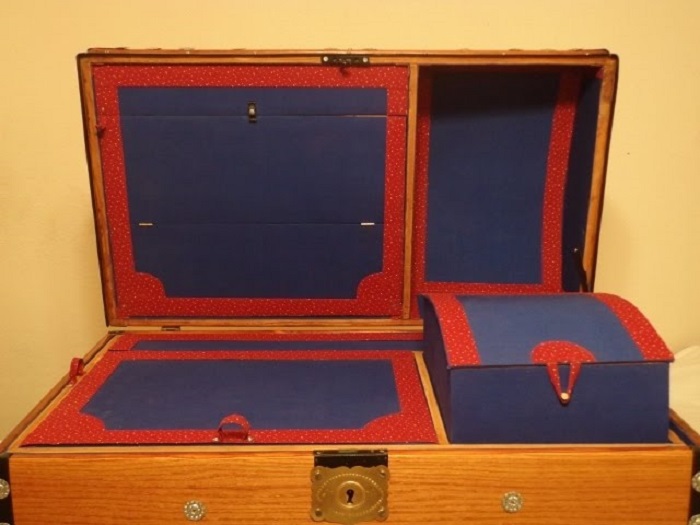
If you want to cover with fabric, we measure the inside of the trunk to make 5-panel templates that make up the base and the walls of the trunk. These templates are lined with the chosen fabric, and a stapler of upholstery or textile glue would also be worth it if you do not have a stapler. Then, we fix the upholstered panels to the base with nails.
Step 7: Paint and finish the application

Upon reaching this step, we have to decide. We may want to give it the same look it originally had or give it another color different from the original. This decision is personal.
We recommend applying up to three layers with a soft brush and cover the edge of the paper. There is no need to paint the inside of the trunk and the rough wood look can make a nice contrast.
Once it has dried, you can use beeswax enamel with which to apply several layers both inside and outside the trunk. The polishing reconditions and the edges of the paper besides protecting all the metal against oxidation.
Step 8: Give beauty to an old wooden trunk

If you have an old piece that belongs to one of your relatives who passed through time, and this precious wooden furniture arrived at your hands, it is time to rebuild it. How will you feel restoring a piece is precious in time, and of great emotional and economic value?
Inside the furniture restoration, the old trunks are some most required to be recovered since the trunks have a very special charm is a beautiful, decorative piece, with history and that allows us to store things inside it.
Step 9: Interior upholstery of old trunk

The first thing that must be done is to carefully remove all traces of the previous upholstery, trying to leave it in optimal cleaning conditions, sand and clean with a damp cloth then let some moisture traits dry. Select the material to be used, paper or fabric, according to your preference.
It takes the internal measurements of the trunk and trims the surfaces. They are glued with a special rubber for furniture, and it is given a more neat finish by placing tape that matches the entire inner edge of the old wooden trunk.
As you can see restoring an old trunk turns out to be a delicate but entertaining activity, when making it have all the materials you need at hand. So, the restoration process is easy and pleasant. You also have the option to put it on sale once restored!

