Growing your own fruits, vegetables, and herbs at home is extremely rewarding. Not only does it allow you to have access to fresh produce at all times, but it can also save you money at the grocery store. Hydroponics is an especially great option for home growing because it allows you to grow plants indoors without soil. Hydroponic systems provide nutrients directly to a plant’s roots through a water-based, nutrient-rich solution. This leads to faster growth rates and often higher yields than traditional soil gardening. Hydroponics also takes up less space, uses less water, and doesn’t require heavy soil or large planting beds. I’ll walk you through everything you need to know to create your own hydroponic indoor garden system DIY at home using affordable and easy-to-find materials. Let’s get started!
Choosing a Hydroponic System

The first step is deciding what type of hydroponic system you want to build. There are a few common options, each with their pros and cons.
Deep Water Culture (DWC)
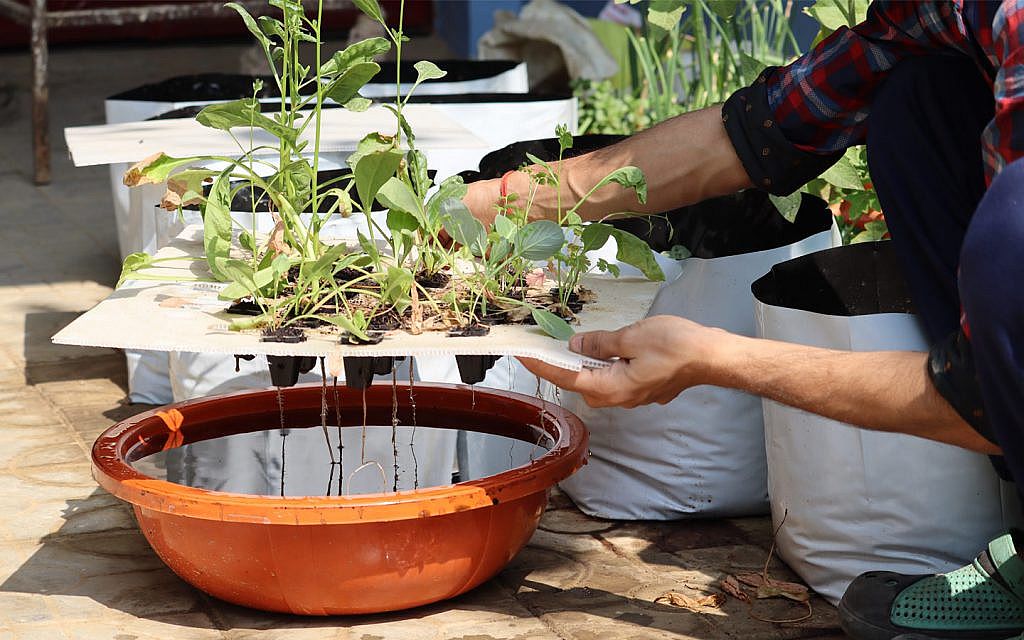
This is one of the simplest and most popular hydroponic systems. Plants are suspended in net pots above a reservoir of nutrient-rich water. An air pump and air stones oxygenate the water to allow the roots to absorb nutrients.
Pros: Very easy to set up and maintain. Requires a small footprint.
Cons: Roots must remain constantly submerged, requiring strict monitoring of water levels.
Ebb and Flow (Flood and Drain)
In this system, plants sit in growing trays filled with clay pebbles or another medium. At regular intervals, a submersible pump floods the tray with nutrient solution, then drains the solution back into a reservoir.
Pros: Allows roots to get both water and oxygen. Requires less monitoring than DWC.
Cons: More complicated setup with a timer required. Need growing medium.
Nutrient Film Technique (NFT)
A constant, shallow stream of nutrient solution is pumped to flow through growing channels, exposing plant roots to nutrients and oxygen.
Pros: Excellent oxygenation of roots. Takes up small footprint.
Cons: Roots can dry out quickly if flow is disrupted. Needs precise control of flow rate.
Wicking Beds
This passive system relies on capillary action to pull a nutrient reservoir up to plant roots through a “wicking” medium like perlite or vermiculite.
Pros: Very simple, no electricity required. Hard to over-water plants.
Cons: Lower oxygenation for roots. Slower growth rate than active systems.
For a first-time DIY system, I recommend starting with either the Deep Water Culture or Wicking Bed method. They are the easiest to set up with minimal specialized equipment required. The other systems work very well but involve a little more complexity.
Choosing a Grow Light
Plants need adequate lighting to thrive. For growing indoors, you’ll need an artificial grow light that mimics the full spectrum of sunlight plants need. There are three common types of grow lights suitable for hydroponics:
LED Lights
LED grow lights provide a full spectrum of light that plants can efficiently use for photosynthesis. They run cool and are energy efficient. Look for a LED grow light panel that provides a balanced mix of warm and cool LEDs.
Compact Fluorescents
CFLs emit a full spectrum of light similar to sunlight. They are inexpensive to buy, but run hotter and use more electricity than LEDs. Opt for CFLs labeled as “daylight” or “plant and aquarium” bulbs.
High Intensity Discharge (HID) Lights
HID grow lights like metal halides and high-pressure sodium provide intense light. But they require high wattage, generate a lot of heat, and the bulb requires replacement every 6-12 months. HIDs work well for larger hydroponic gardens.
For a small indoor garden system DIY system, LED or CFL lights are your best options. Look for lights that provide at least 30 watts per square foot of growing area, and hang them 12″-24″ above plants. Use a timer to control the light cycle.
Sourcing Materials and Equipment
One of the great things about indoor garden system DIY hydroponics is that many of the supplies can be found affordably at your local hardware store. Here’s what you’ll need to get started:
Containers – 5 gallon buckets, plastic storage totes, or other food-grade containers work great to house your reservoir.
Net Pots – Plastic baskets allow you to place plants directly into your nutrient solution. Get 5″ pots for larger plants.
Growing Medium (optional) – Clay pellets or perlite for any system besides DWC where plants sit directly in water.
Air Pump and Tubing – An air pump and air stones oxygenate the nutrient solution. Get one with enough output for your reservoir size.
Water Pump (optional) – For ebb/flow or NFT systems, you’ll need a water pump to flood the grow bed and recirculate solution.
Tubing and Fittings – To route your air and water lines. Go with 1⁄2″ tubing for most setups.
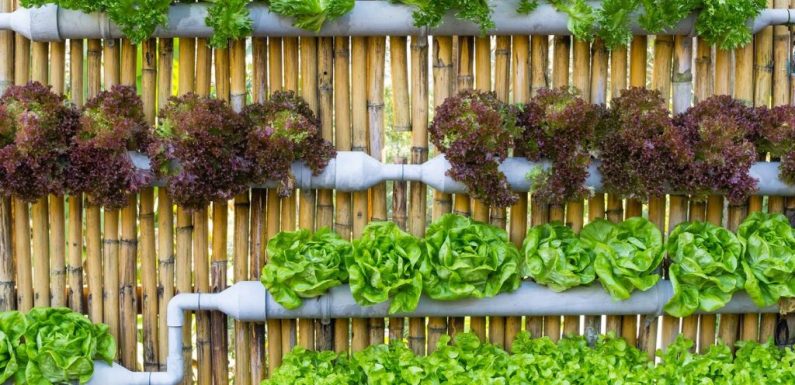
Growing Trays or PVC Pipes – To hold your plants, use food-grade trays or PVC pipes cut to size.
Timer (optional) – Useful for controlling lights and flood cycles. A digital outlet timer works great.
pH Test Kit – Allows you to monitor and adjust pH levels in your nutrient solution. Get drops or litmus strips.
Nutrients – Start with an all-in-one hydroponic nutrient concentrate formulated for your specific plants.
With these basic components, you’ll have everything you need to get your indoor garden up and running!

Setting Up Your Hydroponic System
Once you’ve gathered your materials, it’s time to set up your system:
- Clean and disinfect your reservoir container, pumps, tubing and other components with a diluted bleach solution to kill any bacteria or algae spores. Rinse thoroughly.
- Add your nutrient solution to your reservoir according to the product mixing instructions. Check that your pH is in the optimal range (5.5-6.5 for most plants).
- Install your growing containers like net pots, PVC pipes or growing trays at the proper spacing above the reservoir.
- Add your chosen growing medium like clay pellets to any containers besides net pots.
- Run air tubing from your pump to air stones placed around the bottom of your reservoir. The bubbles will oxygenate your nutrient solution.
- Only for ebb/flow systems: Install your water pump and tubing to route water from the reservoir up to your growing tray. Set up a timer to control the flood and drain cycle.
- Hang your grow lights above the setup and set your timer to 14-16 hours per day.
- Plant seeds or seedlings directly into net pots or your growing medium, then place into your system.
- Turn on pumps, lights and timers. Your hydroponic system is ready for plants!
Maintaining Your Hydroponics Garden
To keep your indoor garden thriving, you’ll need to monitor and adjust a few key factors:
- Nutrient Solution – Check levels in your reservoir frequently and top off with plain or additional nutrient water as needed. Replace the solution completely every 1-2 weeks.
- pH – Test pH every few days and adjust to the 5.5-6.5 range by adding pH up or down solutions if needed.
- Lights – Ensure your grow light is positioned correctly over plants as they grow taller. Prune lower leaves or raise lights as necessary.
- Pumps – Make sure air and water pumps are continuously operating to oxygenate the reservoir. Clean out tubing if any buildup occurs.
- Cleanliness – Clean out your reservoir, pumps and growing channels periodically to prevent algae growth and salt buildup.
Following this maintenance will give your plants the ideal conditions to maximize growth. Monitor plants closely for signs of any nutrient deficiencies and pests. With good care, your hydroponic plants will thrive!
Harvesting from Your Hydroponic Garden
Once your plants mature, it’s time to enjoy the fruits (and vegetables) of your labor! Harvesting depends on what type of crops you are growing, but generally:
- Leafy greens can be harvested by cutting off outer leaves as needed once they reach an appropriate size. This allows the plant to continue producing.
- Fruiting vegetables like tomatoes and peppers can be picked once fully colored and firm. Prune the plants after harvest to encourage more fruit production.
- Herbs like basil and mint are best harvested by cutting off stem tips above leaf nodes. This stimulates bushy, continual growth.
Always use clean, sterile scissors or garden shears for harvesting to avoid introducing diseases. Rinse produce after picking to remove any residue. Enjoy your fresh hydroponic bounty!

Tips for Success with DIY Hydroponics
- Start small – A compact setup with just a few plants allows you to get the hang of hydroponics before expanding.
- Pick beginner-friendly crops – Lettuce, herbs, tomatoes, peppers and greens are all easy hydroponic plants for first-timers.
- Use quality nutrients – Don’t skimp on pre-mixed nutrients designed specifically for hydroponics.
- Monitor pH religiously -pH issues are the most common cause of problems. Test and adjust pH frequently.
- Get good lights – Invest in a high quality LED or CFL light to maximize your plants’ growth potential.
- Find the right location – Situate your system in a spot with stable temperatures away from direct sunlight.
- Clean often – Disinfect all components and change your nutrient solution regularly to avoid algae or bacteria.
- Seek help online – Connect with hydroponic communities if you’re struggling with any issues.
Follow these tips and you’ll be amazed at how much you can grow in a small space indoors!
FAQs
What plants grow best in a home hydroponic system?
Lettuces and leafy greens, tomatoes, peppers, cucumbers, herbs, strawberries and dwarf fruit trees are all great options for DIY hydroponic gardens. Focus on fast-growing veggies and compact plant varieties.
What nutrients do I need for hydroponics?
Use a specialized complete hydroponic nutrient formula with a mix of macronutrients (Nitrogen, Phosphorus, Potassium) and micronutrients plants need. All-in-one formulas make nutrient management easy.
How much will a basic home hydroponic setup cost?
You can get started with a simple DIY hydroponic system for $50-$150. Costs add up for more complex systems with grow lights, pumps and timers. But it’s very scalable depending on your budget.
What are the running costs of a home hydroponic garden?
Ongoing costs include electricity for lights/pumps, replacement nutrient solution every 1-2 weeks, pH supplements, net pots, spare parts, and occasional replacements like light bulbs. Expect $10-$30 per month.
Is DIY hydroponics hard for beginners?
Hydroponics sounds complicated but basic systems like Deep Water Culture are very beginner friendly. Ebb/flow and NFT involve more equipment but you can find step-by-step guides online. Start small and simple.
Conclusion
Growing your own hydroponic indoor garden system DIY is an incredibly fun, rewarding hobby that can provide you with delicious home-grown produce year round. Hydroponics allows you grow abundantly in a small footprint without the hassles of traditional gardening.
With very minimal investment, you can put together a simple yet highly effective Deep Water Culture or Wicking Bed system using basic hardware store components. Pick some easy crops to start, pay close attention to pH, and you’ll be harvesting home-grown fruits, veggies and herbs before you know it!
When determining the best location to plant a hydrangea, consider factors such as soil acidity, sunlight exposure, and moisture levels; much like delving into hydroponics, where, despite the initial learning curve, the online hydroponic community is always eager to assist, paving the way for experimentation and advancement once the foundational knowledge is mastered.
The satisfaction of biting into a tomato you grew yourself makes all the effort worthwhile. Set up your hydroponic oasis, and enjoy having access to the freshest, tastiest produce around!

