

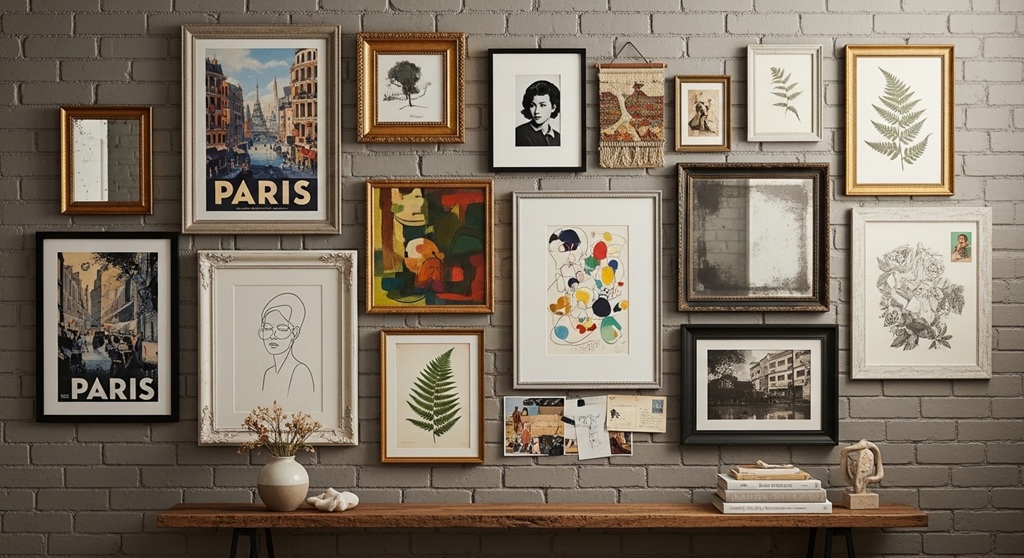
A blank wall often feels unfinished. Many homeowners want a gallery wall but avoid starting because they worry it will look messy or unbalanced. The truth is that creating a clean, professional-looking gallery wall is a repeatable process anyone can follow using simple layout rules and planning steps.
This guide explains exactly how to choose frames, plan spacing, select artwork, test layouts, and hang everything correctly. Whether decorating a living room, hallway, or bedroom, you will learn a reliable method that works in any home.
What is the easiest way to make a gallery wall step by step?
A gallery wall is easiest to create by choosing a theme, selecting frame sizes, planning a layout on the floor first, keeping spacing consistent, anchoring the arrangement around a center point, and hanging pieces from the middle outward using level measurements and removable templates.
This structured method prevents uneven spacing and random placement. It also ensures the wall looks intentional rather than cluttered.
Most beginners skip planning and hang frames one by one. That causes alignment problems quickly. Instead, treat your gallery wall like a grid system with a visual anchor.
Start by selecting a wall area. Measure its width and height. Then define how much of that space the gallery should fill. Designers usually recommend covering 60% to 75% of the available wall area.
Next, choose a visual center point. This is typically eye level at 57–60 inches from the floor. Every arrangement expands outward from that anchor.
Finally, maintain equal spacing between frames. A gap of 2 to 3 inches works best in most homes.
How do you choose the right wall for a gallery display?
The best wall for a gallery display is one that has clear visibility, balanced surrounding furniture, consistent lighting, and enough uninterrupted surface area to support a structured layout without competing décor elements.
Not every wall works well for a gallery arrangement. Placement affects whether the display looks intentional or crowded.
Living rooms are ideal because they naturally attract attention. Hallways work well for storytelling sequences. Staircases create vertical movement that supports layered layouts.
Avoid walls with multiple switches, vents, or shelves interrupting the visual flow. These break alignment and reduce impact.
Consider these placement guidelines before selecting your wall:
- Choose walls visible immediately when entering a room
- Position above sofas, consoles, or beds for grounding
- Avoid walls receiving strong glare from windows
- Ensure enough walking distance for viewing
Furniture also determines gallery width. The arrangement should usually match about two-thirds the width of the furniture below it.
This keeps proportions visually balanced.
How do you select frames and artwork that look cohesive?
Cohesive gallery walls use consistent color palettes, repeated frame finishes, complementary artwork themes, and balanced size variation so each piece supports the overall composition rather than competing for attention.
Consistency matters more than matching exactly. A gallery wall should feel unified but not identical.
You can mix photographs, prints, typography, and illustrations as long as they share at least one connection.
Common unifying elements include:
- Same frame color
- Same mat border size
- Same artwork palette
- Same subject category
For example, black frames with white mats instantly create structure even when artwork styles differ.
If you prefer a relaxed look, mix wood tones but keep spacing identical. Structure replaces uniformity.
Large anchor pieces should appear first in the layout. Smaller pieces support them.
This hierarchy improves readability across the wall.
What layout styles work best for beginners?
The easiest gallery wall layouts for beginners include grid layouts, symmetrical rows, centered clusters, and linear arrangements because they simplify spacing decisions and create predictable alignment patterns.
Structured layouts reduce decision fatigue. They also prevent imbalance.
The most reliable beginner layouts include:
- 2×3 frame grid
- Centered rectangle cluster
- Horizontal row above furniture
- Vertical column in narrow spaces
Grid layouts feel modern and organized. Cluster layouts feel creative but still controlled.
Before hanging anything, test layouts on the floor. Rearrange until spacing feels balanced.
Another effective strategy is paper templating. Cut paper matching each frame size. Tape templates to the wall first.
This prevents unnecessary nail holes.
How much spacing should you leave between frames?
Most gallery walls look balanced when frames are spaced evenly between 2 and 3 inches apart because this creates visual connection while still allowing each piece to stand independently.
Spacing determines whether a gallery wall looks intentional or accidental.
Too little spacing causes clutter. Too much spacing breaks unity.
Use these spacing recommendations:
| Wall Size | Recommended Spacing | Best Use Case |
|---|---|---|
| Small wall | 1.5–2 inches | Hallways and corners |
| Medium wall | 2–3 inches | Living rooms |
| Large wall | 3–4 inches | Staircases and feature walls |
Spacing should remain consistent across the arrangement. Inconsistent gaps weaken structure immediately.
Measure from frame edge to frame edge, not center points.
This keeps alignment visually accurate.
What tools do you need to hang a gallery wall correctly?
A professional-looking gallery wall requires a measuring tape, painter’s tape, level tool, pencil, wall anchors, nails, and paper templates to ensure accurate placement and prevent uneven frame alignment.
Using the correct tools reduces installation errors.
Essential tools include:
- Measuring tape
- Spirit level
- Painter’s tape
- Pencil marks
- Wall hooks or anchors
- Hammer
Painter’s tape helps visualize layout boundaries before drilling.
Wall anchors are especially important for heavier frames. They prevent shifting over time.
A level tool ensures straight alignment across rows.
Even small angle mistakes become noticeable across multiple frames.
How do you hang frames step by step without mistakes?
Hang gallery wall frames by marking the center anchor point first, installing the largest piece, measuring equal spacing outward, checking alignment with a level, and completing outer pieces last to maintain consistent structure across the layout.
Follow this exact installation sequence:
- Mark wall center at eye level
- Hang the largest frame first
- Add adjacent frames horizontally
- Expand upward and downward
- Check spacing after each placement
- Adjust before continuing
This method keeps alignment controlled from start to finish.
Never begin at the corners. Starting from the center prevents drift.
Recheck measurements after every two frames. Small shifts multiply quickly.
Templates help confirm placement accuracy before drilling.
How do you style a gallery wall like an interior designer?
Interior designers style gallery walls by combining one focal piece, maintaining equal spacing, repeating frame finishes, aligning edges visually, and balancing negative space so the arrangement feels structured rather than crowded.
Professional gallery walls rely on restraint more than decoration.
Designers often begin with a dominant center image. Supporting pieces create rhythm around it.
Edge alignment is another key principle. Even mixed layouts usually share at least one straight boundary line.
Balance also includes empty space. Not every inch must be filled.
Consider these styling upgrades:
- Add one oversized anchor artwork
- Mix portrait and landscape orientations
- Repeat frame colors at least three times
- Use mats for visual breathing room
Lighting further enhances gallery impact. Wall sconces or ceiling spots highlight textures and contrast.
This transforms a simple arrangement into a focal feature wall.
Conclusion: How to Build a Gallery Wall That Looks Professional
A gallery wall becomes easy when broken into structured steps. Start with wall selection. Choose a consistent theme. Plan layouts before hanging. Maintain spacing discipline. Install frames from the center outward.
These decisions eliminate guesswork and create balance immediately.
The most successful gallery walls are not random collections. They are planned visual systems built around spacing, alignment, and hierarchy.
Once installed correctly, a gallery wall transforms empty space into a storytelling feature that reflects personality while improving room structure.
Choose your wall, test your layout, and begin building your arrangement today. Small steps produce professional results faster than expected.
Frequently Asked Questions
How high should a gallery wall be hung?
The center of a gallery wall should sit approximately 57 to 60 inches from the floor. This matches average eye level and ensures comfortable viewing without forcing viewers to look up or down excessively.
Can you mix frame colors in a gallery wall?
Yes, frame colors can be mixed if at least one repeating element connects them. Maintaining consistent spacing or mat styles keeps the arrangement visually unified.
How many frames should a gallery wall include?
Most gallery walls include between five and nine frames. This range creates visual impact without overcrowding the wall.
Should all artwork match in style?
Artwork does not need to match exactly. Instead, maintain consistency through color palette, subject category, or framing style.
What is the best spacing between picture frames?
Spacing between 2 and 3 inches works best for most gallery walls. Smaller walls may require slightly tighter spacing.
Can you create a gallery wall without nails?
Yes, removable adhesive hooks allow lightweight frames to be installed without drilling holes into the wall surface.
What rooms benefit most from gallery walls?
Living rooms, staircases, hallways, bedrooms, and home offices benefit most because these areas naturally support visual storytelling displays.
Read More Also: What Is Smart Home Automation
Find How to Install Vinyl Plank Flooring in Bathroom